
Do you have a van (or jeep, truck, off-road, or other vehicle) with…
- hail damage?
- chips, dents or scratches?
- fading or oxidized paint?
- peeling paint?
Are you looking for fender flares for a Chevy Van? Do you have faded bumpers and want to restore the finish? Is a van wrap too expensive? Looking for a Kevlar type paint? Are you looking for a a camo look, military paint or desert look for your van? Looking for a sound deadener for your van? Are you looking for a paint or coating with durability and functionality?
Do you have a Chevy Express van or GMC van with peeling paint? There are hundreds of thousands of white Chevy & GMC vans roaming the streets with peeling paint! If you haven’t noticed this already, now that we’ve pointed it out to you, you’ll see them EVERYWHERE! Unfortunately, GM has yet to step forward to offer a recall on this obvious factory paint peeling problem on Chevy and GMC vans. Equally unfortunate, fixing peeling paint is no easy task and could cost thousands of dollars. Fixing hail damage is costly as well, not to mention that as soon as you fix it, another hail storm could pop up and you’ll be right back where you started… with hail damage!
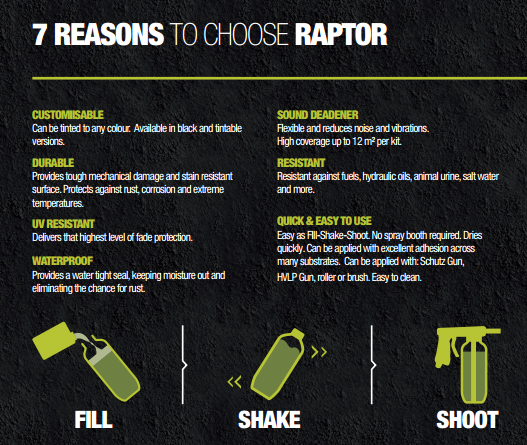
Perhaps you want a new color on your van or an off-road look? Would you like your paint to be scratch, stain and hail resistant? How about being resistant to corrosion from road salt and rust? How about a paint with a UV protectant (UV inhibitor) that also acts as a sound deadener?
Is there such a product? We thought about adding a wrap to the van, but not only does that cost 2 or 3 thousand dollars, it only lasts about 5 years and any peeling paint or hail damage would show right through. So there’s more time and money involved just to prep it for a wrap. We certainly didn’t want to go to the expense of repairing every little blemish and dent in order to do a professional, traditional paint job either.
We wondered…. is it possible to get all of the good things mentioned above AND find a solution for all of the bad things mentioned above?
After much research and deliberation, Mike found an amazing solution that SOLVES ALL OF THESE PROBLEMS!
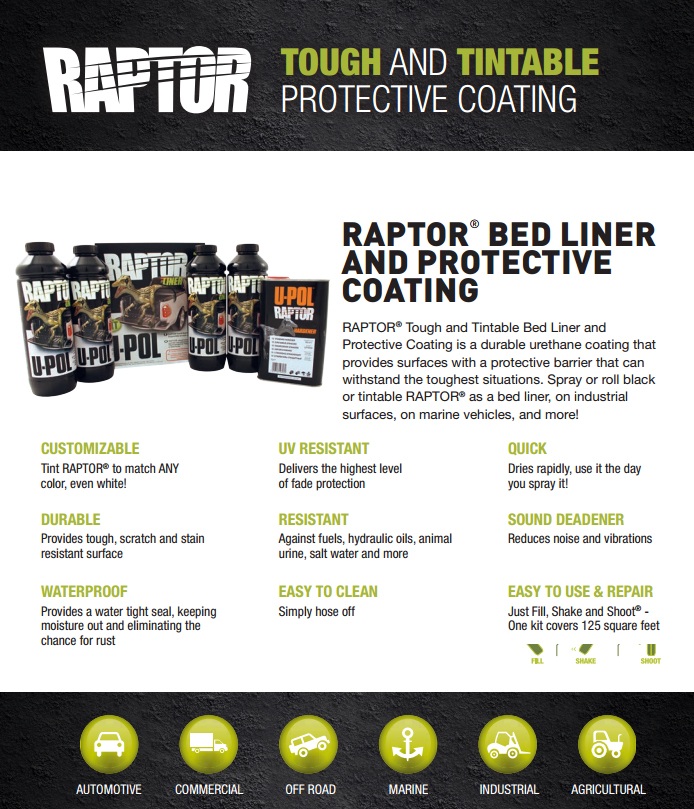
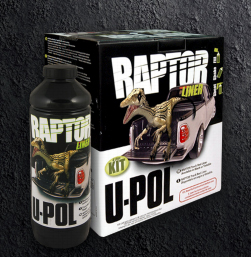 It’s called RAPTOR! U-POL’s RAPTOR bed liner coating is a durable 2K polyurethane coating that provides surfaces with a protective barrier. It’s a textured, protective coating that was traditionally used for truck bed liners. You’ve probably seen it applied to a jeep here and there and other off-road type vehicles as well. Other coatings, like Rhino Liner, Line-X, Herculiner, Durabak, Rust-Oleum, Monstaliner and paint with Kevlar (usually 4-5 grand), have similar properties. After much research on all of the bed liner choices out there, and due to RAPTOR’s amazing reviews and great ratings, we chose to go with RAPTOR. And by the way, there is no rubber in RAPTOR. RAPTOR is a thick polyurethane coating, which gives it great UV stability and impact resistance without the use of additives such as rubber.
For a product to be inexpensive (you can do your whole van in RAPTOR for about $300-500), easy to apply, a DIY product, heat, scratch, stain, UV and fade resistant, plus be a sound deadener, we couldn’t be more happy with it! We wanted a matte finish and RAPTOR comes pretty close with a slight sheen. We applied RAPTOR to our camper van (see video above) and we want to share with you the how-to, DIY tips and tricks to applying U-POL RAPTOR to your van.
U-POL RAPTOR PRODUCTS:
For the bottom of the van and the bumpers, we only used two bottles of the black RAPTOR Kit (which comes with 4 – photos of product shown below) but since you need the hardener, getting the kit is more cost effective than buying single bottles. Get the 1.7 VOC version!
For the rest of the van … top, sides, hood, etc…, we used two boxes of the tintable RAPTOR kit (that’s 8 bottles in total – photo of kit shown below). Get the 1.7 VOC version for lower VOCs! We had just enough paint with little to none left over. For the tintable paint, you’ll also need to tint the RAPTOR with the color of your choice. Even if you want white RAPTOR, get the tintable and add white tint (there are a million shades of white). To tint the RAPTOR, you’ll need automotive paint and one good way to get just what you want – since colors can be very tricky – is to go to an automotive paint store and have them help you out (have them make you extra paint to save for later touch ups).
In addition to the paint products themselves, we used one spray gun for the whole project (clean spray gun in-between bottles and in between color changes). We did not use a respirator but we were in a paint booth with a fan sucking up all the vapors and spray. Even still, we wished we had worn respirators as you cannot be too careful with the one set of lungs that God gave you. We recommend planning ahead and getting a respirator so that you don’t get antsy to spray your vehicle and say “oh well, I don’t have a respirator, let’s do this anyway.” Besides, you can use the respirator for other projects later!
Warning: These products contain hazardous materials, including solvents and an isocyanate (ISO) hardener (thanks to David L. for bringing ISO to our attention!!!), and therefore appropriate personal protective equipment should always be used… specifically, an air-fed respirator, gloves and a paint suit. We want you to be safe and protected! Please do your own research and follow all safety recommendations recommended by U-Pol. This DIY video and post are for informational purposes only and are only our opinion and information on how WE applied the product to OUR camper van. We are not experts on this product. Backroadsvanner.com provides no warranty or guaranty and cannot be held liable for issues resulting from the implementation of the information provided. The company’s instructions and safety measures supersede everything we say, whether on the video, text, comments or social media. Please refer to, and perform, all instructions and wear all recommended safety gear as recommended by the manufacturer of the products described. Please verify all info using U-POL’s official web site for RAPTOR products.
Products List…. these are the products you will need to apply the RAPTOR coating to your van or other vehicle:
- black RAPTOR Kit and / or tintable RAPTOR kit (each kit comes with 4 bottles and 1 hardener – we used 10 bottles of RAPTOR for our entire camper van exterior)
- a spray gun
- Safety equipment: gloves, paint suit and an air-fed respirator – IMPORTANT…RAPTOR utilizes solvents and an isocyanate hardener – a special air-fed respirator is advised. Please do your own research and follow all safety recommendations recommended by U-Pol.***
- a sander / sandpaper (P120-P180),
- paper and tape (to cover everything you don’t want sprayed),
- possibly some drop cloths (depending on the location where you spray),
- xylene or acetone to clean your spray gun (and remove any grease or debris from your van during prep),
- a compressor to use with the spray gun,
- an air tip for your compressor that you can use to blow any remaining dust off of your van before you spray and some clean, tact cloths,
- Optional:
- Urethane based reducer: If you want to reduce or thin the RAPTOR coating (you can reduce it up to 10%), you’ll need a urethane based reducer.
- U-Pol’s Etch Primer: If you sand any parts of your vehicle down tot he bare metal, you can use U-Pol’s Etch Primer (also called Acid #8), which promotes paint adhesion to difficult substrates such as galvanized steel & aluminum.
- U-Pol’s Adhesion Promoter: If you have any areas where you’re concerned about adhesion – perhaps places where you cannot sand – you can use U-Pol’s Adhesion Promoter, which provides an excellent barrier in areas where lifting or solvent attaching may be a problem. We didn’t use the Adhesion Promoter, also called Grip #4, ourselves but thanks to David L., we are aware that the chemicals in this product necessitate you wearing protective gear! So please do so.
See below for prep, spray & application tips and more!
(4 bottles of black Raptor + hardener. Get this kit if you want lower VOCs!)
(4 bottles of tintable Raptor + hardener. Get this kit if you want lower VOCs!)
(Fits onto Raptor bottles. Using a different spray gun, may require adding thinner)
(Med. 95% filter efficiency against aerosols, organic vapors)
(Promotes paint adhesion to difficult substrates such as galvanized steel & aluminum)
(Provides an excellent barrier in areas where lifting or solvent attaching may be a problem)
*You will also want to get an air-fed respirator to use during spraying.
PREPARATION IS KEY!
To achieve best results with RAPTOR, good preparation is essential.
- Remove all loose material and any rust from the surface to be coated.
- Clean and degrease the surface.
- Abrade the surface with P120-P180 abrasives.
- Re-clean the surface.
- Tape off any areas where you do not want over spray! Take the rubber or seals off windows, etc. where possible, prior to taping.
TIP: Make more tint than you will need – and store it separately in case you ever need to replicate the color again for touch ups or additional paint jobs!
TIPS DURING / POST APPLICATION OF RAPTOR:
- SPRAYING RAPTOR:
- Read all instructions prior to beginning!
- Wear a respirator & protective clothing as recommended by U-Pol!
IMPORTANT…RAPTOR utilizes an isocyanate hardener – a special air-fed respirator is advised and therefore, the link we provided to this respirator may not be enough protection. Please do your own research and follow all safety recommendations recommended by U-Pol.*** - If using tintable RAPTOR, add your tint and shake to check color. (there is a fill line on the bottle)
- Add the hardener (there is a fill line on the bottle) – Only mix one bottle of RAPTOR at a time.
- Screw cap securely back on the bottle.
- Shake bottle for 2 minutes to thoroughly mix contents.
- Remove cap from mixed RAPTOR bottle.
- Attach the RAPTOR bottle to the U-POL UP0726 gun. (Clean gun between bottles.)
- Adjust the air pressure on your compressor to 40-60 PSI. The air pressure will determine whether your texture is smaller or larger. Spray a few test samples on a piece of cardboard or other surface to see what you like best.
- Apply with your spray gun (about 8-24 inches or so away from the surface) to the prepared surface with an even sweeping motion to obtain the desired texture. The key is to be consistent with whatever method and distance you choose. Don’t spray too close as the air compressor will flatten out the paint and mess up your texture.
- TIP: When you’re at the end of a bottle, put a cap on it and save it until all spraying is done. Once all spraying is done, use a paint brush and get out any extra paint left in the used bottles and use it to paint hard-to-reach places (like crevices by the bumper, for instance). Since the spray gun cannot be sprayed close enough to the vehicle to get into tight spots, a brush might be the only way to get in there. Do this within an hour after all spraying is done as the paint left in the bottles will harden.
- If applying additional coats, wait 60 minutes between coats.
- IDEAL TEMPERATURE WHEN APPLYING RAPTOR: Do not use in extreme cold or hot temperatures. Ideal application temperature is 68ºF (20ºC) with humidity of less than 60%.
- WHEN TO REMOVE THE OVER SPRAY PAPER & TAPE: Wait between 15-20 minutes after applying RAPTOR before removing any tape.
- TIME BETWEEN RAPTOR COATS: Wait 60 minutes between coats.
- RAPTOR CURING TIME: Applied Raptor will be dry to the touch in one hour (in 68ºF weather) and you can perform light duties in 2-3 days, it really needs 5-7 days to fully cure. Do not place heavy loads on the surface until RAPTOR is fully cured. It takes 5-7 days to fully cure in 68ºF (20ºC) weather.
- CAN RAPTOR BE REDUCED / THINNED? YES, RAPTOR can be reduced up to 10%. Use a urethane based reducer. (and FYI, if you use an HVLP gun instead of the one listed above, you will have to use a reducer).
RAPTOR TECHNICAL DATA:
Helpful PDFs: U-POL RAPTOR DATA SHEET | U-POL RAPTOR INFO | U-POL Web Site
SHELF LIFE AND STORAGE:
RAPTOR’S shelf life and storage: RAPTOR will keep for 2 years from date of manufacture if it’s in its sealed original containers…. store in cool, dry conditions in the original containers.

DISCLAIMER: Warning: These products contain hazardous materials, including solvents and an isocyanate hardener, and therefore appropriate personal protective equipment should always be used… specifically, an air-fed respirator, gloves and a paint suit. We want you to be safe and protected! Please do your own research and follow all safety recommendations recommended by U-Pol. This DIY video and post are for informational purposes only and are only our opinion and information on how WE applied the product to OUR camper van. We are not experts on this product. Backroadsvanner.com provides no warranty or guaranty and cannot be held liable for issues resulting from the implementation of the information provided. The company’s instructions and safety measures supersede everything we say, whether on the video, text, comments or social media. Please refer to, and perform, all instructions and wear all recommended safety gear as recommended by the manufacturer of the products described. Please verify all info using U-POL’s official web site for RAPTOR products.